Part 2: GCP DialogFlow Voice Chat Tracking Using Adobe Analytics [Part 2/2]
Introduction#
This article is in continuation to my previous article where we create a fictitious Cab Booking ChatBot on Google Assistant [BookMyRide], If you haven’t read it yet Kindly refer here Part 1: GCP DialogFlow Voice Chat Tracking Using Adobe Analytics [Part 1/2]
Starting off where we left#
Fulfillment: Defines the conversation interface for our Actions [or Intents created] to logically process the user expression and generate response. We can generate dynamic responses based upon user inputs instead of static responses. This is where we calculate user cab fare, estimate time of arrival of cab and travel time to destination hence eventually fulfill the intent.
In order to enable Fulfillment for our Intent we need to enable webhook call for our intents. The below screen capture demonstrates the setting to enable fulfillment for our intents.
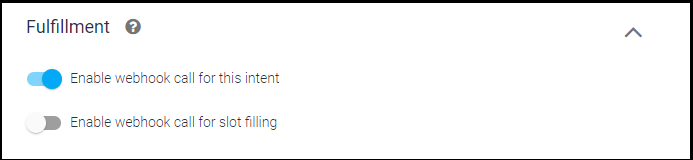
The Fulfillment code is hosted in a webhook fulfillment logic [index.js] file and when an intent is triggered that uses fulfillment we receive a request from DialogFlow that contains information about intent . We can build response by processing user request. This request and response is defined by DialogFlow Webhooks.
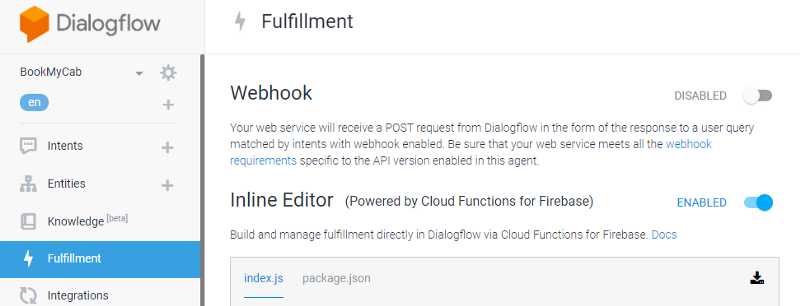
DialogFlow provides Inline Editor — Powered by Cloud Functions for Firebase that can be enabled under Fulfillment tab in DialogFlow console.
Initialize the Dialoglow Object#
The following code snippet initializes the DialogFlow object and does setup some boilerplate Node.js setup for Google Cloud Functions.
'use strict';
const {dialogflow} = require('actions-on-google');
const functions = require('firebase-functions');
const app = dialogflow({debug: true});
app.intent('Default Welcome Intent', (conv) => {
  // Do things
});
exports.yourAction = functions.https.onRequest(app);
The app.intent method above is where we define our Intent as created in Google Dialog Flow console. The {conv} object above contains required data points for processing user expression and developing response. Below are three methods that we will use to drive chatbot conversation throughout this article. For complete reference access [Client Library]
- — conv.ask() : Asks to collect user’s input. All user’s queries need to be sent to the app. This is where we will respond to user query asking for his input.
- — conv.data property : The session data in JSON format. Stored using contexts. This object is used to store session data for user inputs/selections, the digital datalayer will be defined on this object to pass information to Adobe Analytics tracking calls.
- — conv.close() : Chatbot [Assistant] render the speech response and close the microphone. Typically the end of conversation.
Based upon the Chat Flow shared in Part 1 and Intent created. Below is the Fulfillment code for our Car Type and Destination Intent.
app.intent('cartype', (conv, {car_type}) => {
const _eta = random(2,20);
conv.data.cartype = car_type;
conv.data._eta = _eta;
conv.ask(`The nearest ${car_type} will reach your location in ${_eta} minutes.`);
conv.ask(`Please provide your destination!!'`);
});
app.intent('destination', (conv, {geo_city}) => {
const fare = random(400,1500);
const hour = random(1,6);
const min = random(10,59);
// extract the geo-city parameter as a local string variable
conv.data.fare = fare;
conv.data.hour = hour;
conv.data.min = min;
conv.ask(`The estimated fare for ${geo_city} is ${fare} rupees, You should reach your destination in ${hour} hours and ${min} minutes`);
//Save geo_city locally
conv.data.geo_destination = geo_city;
conv.ask(`Would you like to book cab right away!
Reply with Yes to book cab, Cancel to abort booking!`);
//Atmost two simple responses supported
});
In the snippet above the {car_type} and {geo_city} are the parameters [Entities] that we extract from user input and save in {conv.data} as our datalayer attribute these will be referenced in Adobe Analytics tracking calls to set custom variables.
Adobe Analytics Tracking#
The Adobe Analytics provides out-of-box reporting enablement for Voice and and ChatBots. These reports can be enabled by modifying Report Suite settings [Report Suite Settings » App Management » App Reporting » Enabled Voice and Chatbots]. This report is be auto-populated using back-end processing rules to map context variables set in tracking calls. Example c.Intent=car_type
Sample tracking call for reference :
GET /b/ss/[rsid]/1?vid=[UserID]&c.a.AppID=BookMyRide_1.0&c.a.LaunchEvent=1&c.Intent=car_type&pageName=[intent]
HTTP/1.1
Host: example.sc.omtrdc.net
Cache-Control: no-cache
Solution Design#
Now comes the final part of stitching all data points together and mapping them to variables for analytics tracking calls. For the ease of implementation I have setup a custom function that will create Adobe Analytics Tracking calls in required format.
function _AA_Tracker(_path) {
  const options = {
  hostname: '{your-tracking-server-here}',
  path: `/b/ss/{report-suite-id-here}/0?vid=${userID}`+_path,
  method: 'GET'
};
const req = http.request(options, (res) => {
  console.log(`statusCode: ${res.statusCode}`);
  console.log(options.path);
//This will be useful for debugging tracking calls in Firebase console.
});
req.on('error', (error) => {
  console.error(error);
//This will be useful for debugging tracking calls errors in Firebase console.
});
req.end();
}
We will use above function to send tracking calls to Adobe Analytics Data Insertion API. This function will be invoked with required variables/metrics and values in string format whenever an Intent is executed in our app.intent() methods specified in Fulfillment code. Below is sample code for tracking data points in {car_type} Intent.
app.intent('cartype', (conv, {car_type}) => {
const _eta = random(2,20);
conv.data.cartype = car_type;
conv.data._eta = _eta;
conv.ask(`The nearest ${car_type} will reach your location in ${_eta} minutes.`);
conv.ask(`Please provide your destination!!'`);

//Analytics Call
let _trackerPath = "&c.a.InstallEvent=1&c.a.InstallDate={date-here}&c.Product=GoogleHome&c.a.AppID=bookmyride_v1"+
`&c.Intent=car_type_intent&pageName=car_type_intent&server=${conv.data.host}&c21=car_type_intent&c30=${conv.data.user.lastseen}&c22=${conv.data.user.language}&c26=${conv.data.input_type}&c29=${conv.data.user.userid}&c23=${conv.data.cartype}`+
"&events=event12"+
`&v19=${conv.data.user.language}&v20=car_type_intent&v21=${conv.data.conversationID}&v22=${conv.data.version}&v30=${conv.data.user.lastseen}&v31=${conv.data.input_type}&v29=${conv.data.user.userid}&v23=${conv.data.cartype}`;
//Invoke Tracking Call using custom function created.
_AA_Tracker(_trackerPath);
});
As you can see we’ve mapped variables/metrics with {conv.data} object which acts as our datalayer for storing values and then referencing in adobe analytics tracking calls. There few built in properties on {conv.data} object which can be reference directly. Example {conv.data.input_type} which determines if user expression was voice based or text [typed].
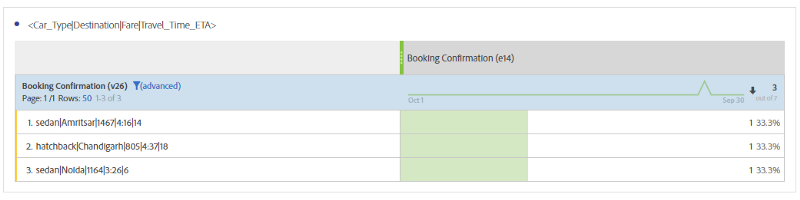
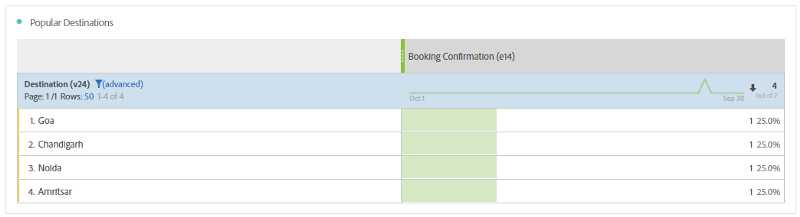
he tracking calls above will set required variables and metrics which helps business optimize voice-app development, increase engagement and understand the impact of consumer voice in context of overall customer experience with ChatBots. Below is sample reports generated from our fictitious voice based cab booking service [BookMyRide].
Few Important Considerations#
- Firebase Free Plan [Spark Plan] doesn’t allow sending HTTP requests to Adobe Analytics [or other Non-Google Platforms]. In order to track adobe analytics Firebase plan needs to be upgraded to Flame Plan.
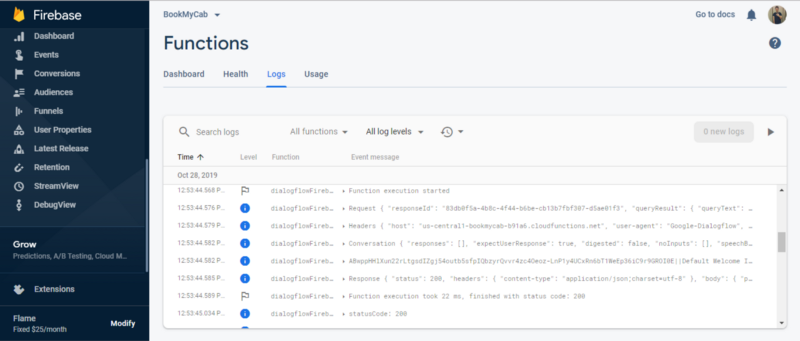
- The Firebase execution logs can be used to debug errors, warning and also you can console.log any required values. [Sample Execution Log Below]
References#
- https://www.adobe.com/content/dam/acom/en/data-analytics-cloud/analytics/voice/wp-analytics-for-digital-assistants.pdf
- https://docs.adobe.com/content/help/en/analytics/implementation/digital-assistants-white-paper.html
- https://actions-on-google.github.io/actions-on-google-nodejs/2.12.0/index.html
- https://cloud.google.com/dialogflow/docs