Data Pipeline: Adobe Analytics Data Warehouse To BigQuery
Introduction#
BigQuery is a cloud-based data-warehouse solution from Google Cloud Platform (referred to as GCP in this article). It is server-less, highly scalable, and cost-effective.
It is a fully-managed, multi-cloud analytics solution that lets us query billions of rows of data in second. It is one of the most efficient and cost-effective analytical data-warehouse offerings available in the cloud- computing ecosystem.
The best part GCP provides free tier with some resources free of charge up to a specific limit. We will be using a free-tier BiqQuery account for our data-pipeline, although GCP charges some fees to store & process data when running queries on stored data.
Data Pipeline#
Data Pipeline is a series of data-processing steps where the output of one data platform system is utilized to load data into another system with required data modifications and transformations.
To load adobe analytics processed data into GCP BigQuery, We don’t have an out of the box utility. We can perform this sequence manually by using the below steps but these would require continuous effort.
We would need to schedule a DWH request with the required dimensions/metrics and get delivered on Omniture FTP, then we will need to manually download the zip/CSV file and load it into BigQuery either using GCP console/CLI or BigQuery API.
Automate Complete Process#
We will be automating the complete process end-to-end for loading adobe analytics data warehouse CSV/zip files into BigQuery on a weekly schedule (This can be easily modified to be hourly/daily/monthly) etc.
GCP Architecture
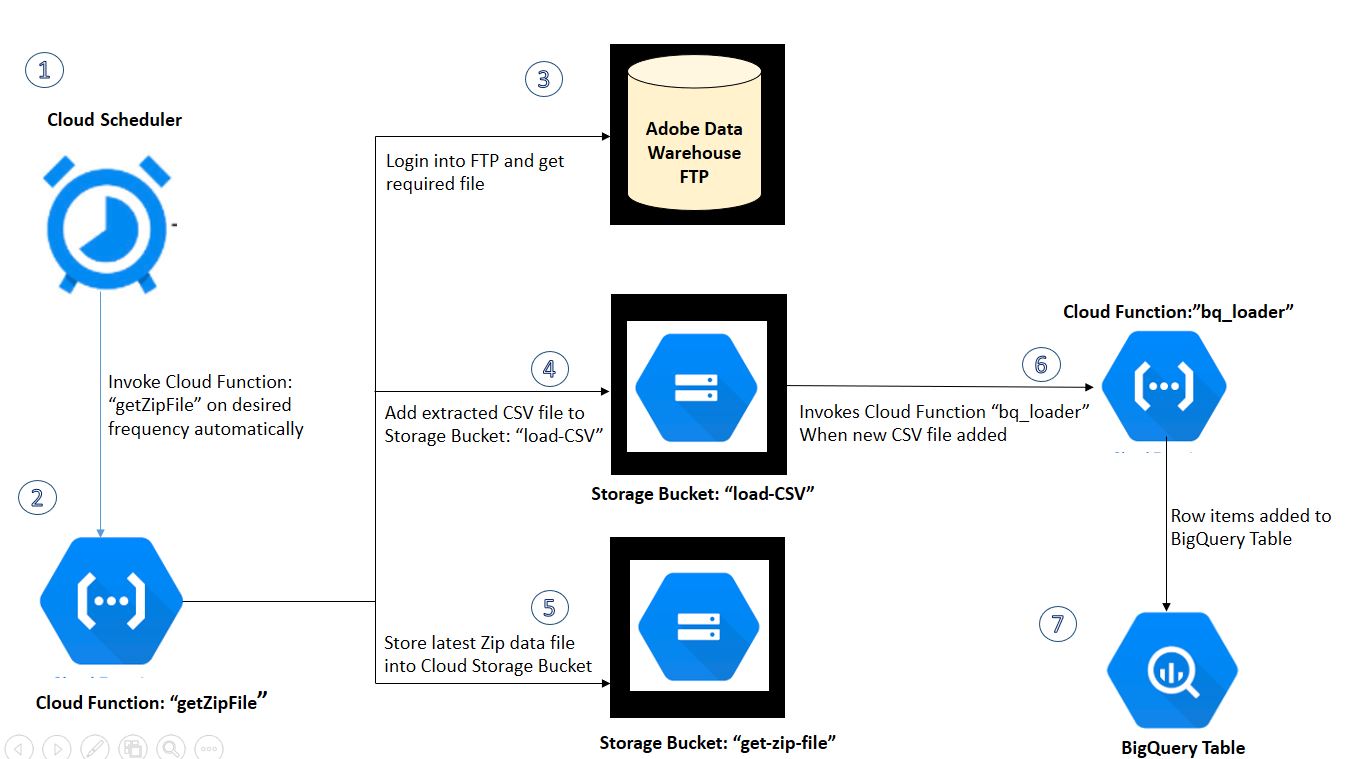
Google Cloud Platform Services
BigQuery > This is the self-managed cloud data-warehouse where we will have our complete adobe analytics data ingested on the selected frequency for analysis.
Cloud Function > We will set up two cloud functions and will be using Python as the run-time language. First will get the file from adobe analytics FTP, unzip the file to get CSV, and then second to load our CSV to BigQuery Table.
Cloud Storage > Storage bucket locations, we will set up two buckets in our project, first one will store file from the adobe data warehouse, second with CSV to load into bigquery.
Cloud Scheduler > Fully-managed cron job scheduler to automate our data ingest process.
Process Overview#
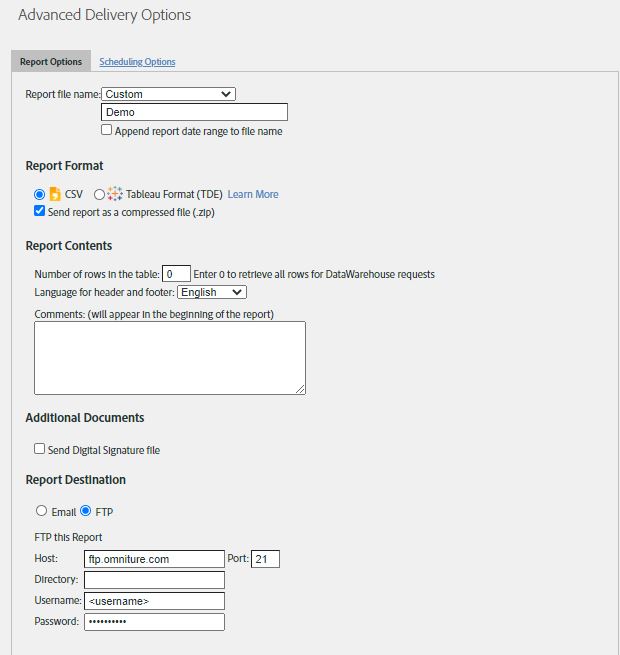
Step 1>. Set up Adobe Data-Warehouse request with required dimensions/metrics. For this demo, we’re pulling dimension [Page URL] and Page Views metric. In Advance Delivery Options
- Report File Name: Select the appropriate name for your file, this will be delivered to FTP and the file name will be used in our script.
- Send report as a compressed file (.zip): Make sure to check this check-box since the adobe analytics will automatically zip files above 10mb, this can result in ‘.zip’ format instead of ‘.csv’ so we will request delivery in ‘.zip’ format only to avoid errors.
- Report Destination: Select FTP for report delivery and add your FTP username and password.
- Select the scheduling option as per your required frequency.
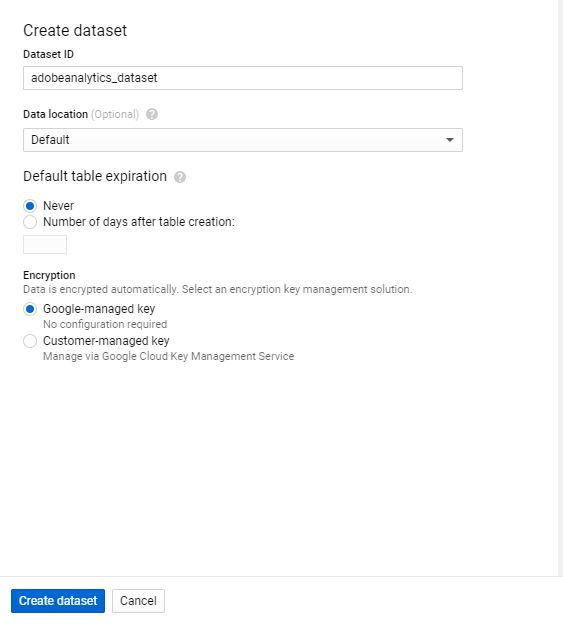
Step 2> Setup BigQuery Table > We can also programmatically create our table and load CSV file data but we will create the empty table manually in the BigQuery interface.Step 2.1> Create Dataset in your existing project. (we will use default configuration settings)
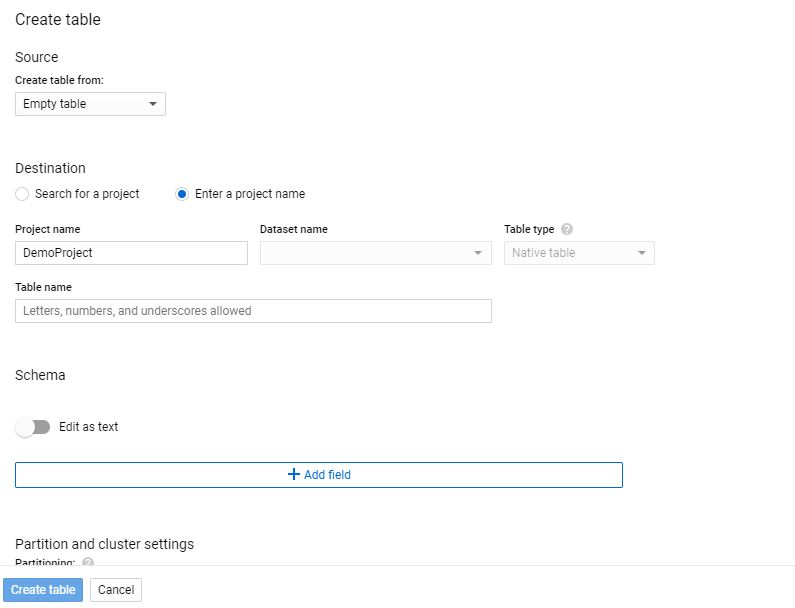
Step 2.2>
- Create an empty table
- Select your project name, add dataset name and table name for this data set.
- We will leave all other configurations to be a default, we can setup schema manually or by uploading CSV from Cloud Storage. For our load job we will let bigquey autodetect schema of table.
Step 3> Google Storage Buckets: We will create two buckets for our data pipeline, the first bucket will keep ZIP files retrieved from adobe analytics FTP and the second bucket will be used to add extracted CSV files and load them to BigQuery. We will name them as following -Bucket One - “get-zip-file” Bucket Two - “load-CSV” We will keep all other settings to default and save buckets.
Step 4> Now let us set up our Cloud Functions, We will need two functions. First Cloud Function - “Get File” - This will log into adobe analytics FTP account and get the ZIP file to Cloud Storage Bucket “get-zip-file”, then unzip the file and place the CSV file [outputforBQ.csv] into “load-CSV” storage bucket.
Create Function one [Name: ‘getZipFile’] with HTTPS trigger, select python 3.7 from runtime drop-down and ‘getZipFIle’ as entry point.
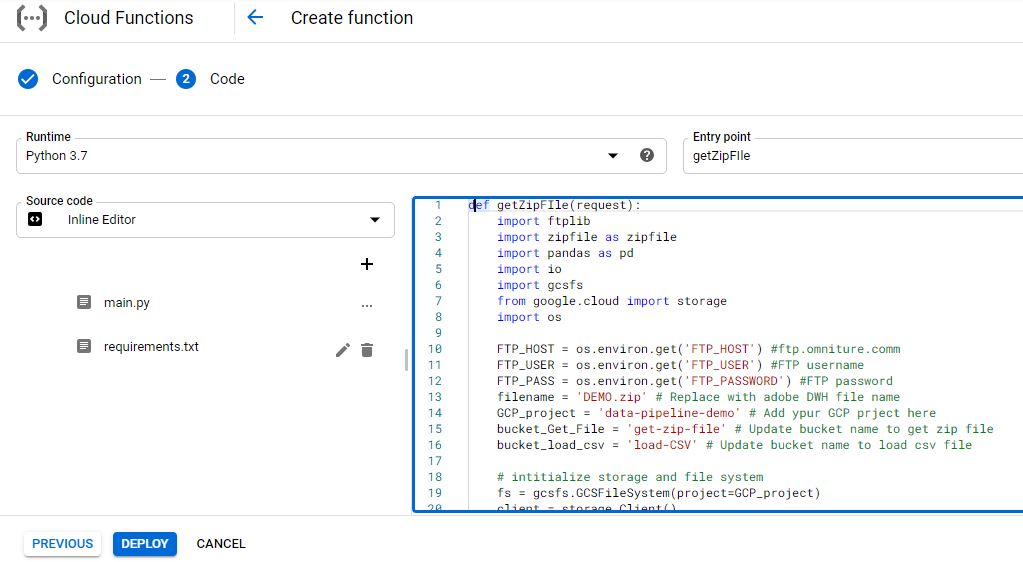
def getZipFile(request):
    import ftplib
    import zipfile as zipfile
    import pandas as pd
    import io
    import gcsfs
    from google.cloud import storage
    import os

    # Update below in script with your project details
    # Environment Variables can be used for sensitive values.
    FTP_HOST = os.environ.get('FTP_HOST') #ftp.omniture.comm
    FTP_USER = os.environ.get('FTP_USER') #FTP username
    FTP_PASS = os.environ.get('FTP_PASSWORD') #FTP password
    filename = 'DEMO.zip' # Replace with adobe DWH file name
    GCP_project = 'data-pipeline-demo' # Add ypur GCP prject here
    bucket_Get_File = 'get-zip-file' # Update bucket name to get zip file
    bucket_load_csv = 'load-CSV' # Update bucket name to load csv file
    # intitialize storage and file system
    fs = gcsfs.GCSFileSystem(project=GCP_project)
    client = storage.Client()
    bucket = client.get_bucket(bucket_Get_File)
    blob = bucket.blob(filename)

    if blob.exists() == True:
        bucket.delete_blob(filename)
        print(f'delete existing zip file from bucket: {bucket_Get_File}')

    if blob.exists() == False :
        try:
            # connect to the FTP server
            ftp = ftplib.FTP(FTP_HOST, FTP_USER, FTP_PASS)
            # force UTF-8 encoding
            ftp.encoding = "utf-8"
            encoding = "utf-8"
            with fs.open(bucket_Get_File+'/'+filename, "wb") as file:
                ftp.retrbinary(f"RETR {filename}", file.write)
            ftp.quit() #FTP quit
			# read content for zip file
            zip_csv = fs.open(bucket_Get_File+'/'+filename, 'rb')
            with zipfile.ZipFile(zip_csv) as zfile:
                for name in zfile.namelist():
                    with zfile.open(name) as readfile:
                        data = io.TextIOWrapper(readfile, encoding)
                        df2 = pd.read_csv(data)
            # write file to load bucket
            file_forBQ = fs.open(bucket_load_csv+'/outputforBQ.csv','w')
            file_forBQ.write(df2.to_csv(index=None,sep=",",))
            file_forBQ.close()
            print(f'file > {filename} added!')
        except:
            print('something went wrong')
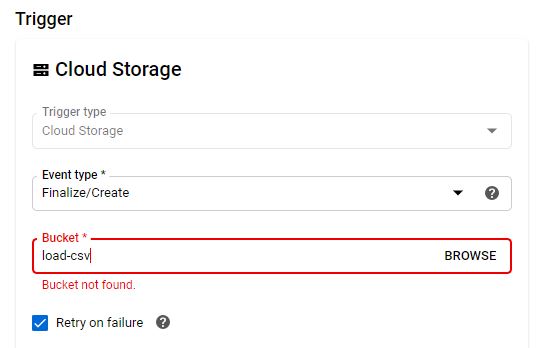
Create Function two [Name: ‘bq_loader’] and select trigger type = ‘Cloud Storage’, Event Type = ‘Finalize/Create’ and bucket = ‘load-CSV (bucket two in our article). This function will automatically trigger and add CSV file data to BigQuery Table once we add CSV file. Select python 3.7 from runtime drop-down and ‘load-csv’ as entry point.
def load_csv(event, context):
     from google.cloud import bigquery
     import gcsfs
     #from google.cloud import storage
     import os
     import csv
     # Construct a BigQuery client object.
     client = bigquery.Client()
     #Update uri as per your BQ table
     uri = "gs://load-CSV/outputforBQ.csv"
   # replace below values wirh your project, dataset and table name
     table_id = "projectNameHere.datasetHere.tableNameHere"
     job_config = bigquery.LoadJobConfig(
          autodetect=True, source_format=bigquery.SourceFormat.CSV,skip_leading_rows=1
     )
     load_job = client.load_table_from_uri(
          uri, table_id, job_config=job_config
     )  # Make an API request.
     load_job.result()  # Waits for the job to complete.
     destination_table = client.get_table(table_id)  # Make an API request.
     print("Loaded {} rows.".format(destination_table.num_rows))
# Dependencies
google-cloud-bigquery==1.27.2
gcsfs==0.6.0
fs-gcsfs==1.2.0
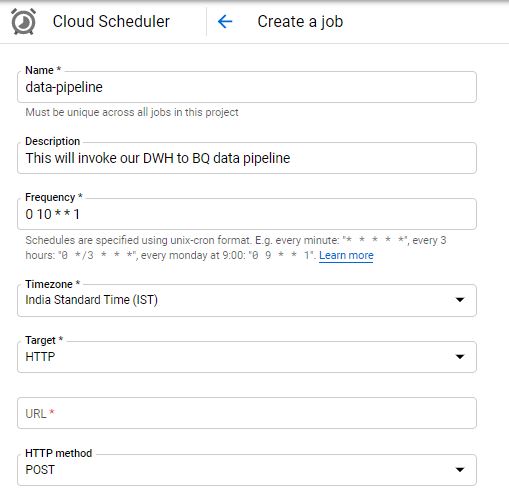
Step 5> Automate the process using CLoud Scheduler, We will invoke our cloud function ‘getZipFIle’ using HTTP endpoint. The frequency will determine the invocation time for our function we can set frequency as required. You can also use https://crontab.guru/ to setup cron job frequency.
- In case you notice cloud storage permission issues - try adding ‘allUsers’ permission for Cloud Storage permission, this will make bucket public make sure not to use it for production.
Closing Notes#
The process above will load the CSV file directly into our BigQuery table for data analysis/visualization and other numerous analytical tasks, we can also transfer data add/update columns to file pulled from the adobe analytics data warehouse before we push the file to the bigquery table.
If you enjoyed this post, I’d be very grateful if you’d help it spread by sharing it on Twitter/LinkedIn. Thank you!